ChatGPT as a Maker: How to Build a Robot Using AI
We’ve all heard recent AI breakthroughs such as software generating art that takes the phrase "steal like an artist" to new levels, and deepfakes sending former NASA engineers into dangerously unstable spirals. But how close are we to Skynet and a garrison of T-800 terminators taking over?
I’ll be trying to answer that question in this blog post by using the ChatGPT AI bot to teach me how to build an entire robot from scratch.
Getting Started with ChatGPT
What is it?
ChatGPT is an AI chatbot that performs well in conversation. It recalls context from earlier points in a conversation enabling it to respond to followup questions, elaborate on earlier prompts, challenge incorrect premises, and even admit it’s own mistakes when corrected. I could go on writing a full description of ChatGPT but why not get it to describe itself? Here’s the response:
You can start your own converstation with ChatGPT here.
My interest in using ChatGPT is to accelerate the design and building process of personal projects, in this case a line following robot. It has been established that ChatGPT can write fairly respectable code (larger programs are problematic) but how does it perform in other areas of the the DIY makers workflow? How can we utilize it to do other things like plan electronic wiring schematics, create design files for laser cutting and 3D printing?
“Hello World”
Before getting too carried away, let’s start with a classic “Hello World” project: use an Arduino to blink an LED on and off. Let’s start off simple by asking it what components we need to achieve this:

One of the more impressive elements of this chatbot is it’s ability to infer meaning and extrapolate responses. We only asked it for a list of components, but it made an assumption that we may want further instruction on how to actually use these components and gave a list of steps to follow.
If you want to try these steps out yourself this Arduino starter kit has all the components you’ll need.
In a follow up question I asked it to write out the program it mentioned as “step 4”. The following is the code it returned and sure enough, it worked! Give it a try yourself!
void setup() {
  // Set the pin connected to the LED as an output
  pinMode(13, OUTPUT);
}

void loop() {
  // Turn the LED on
  digitalWrite(13, HIGH);
  // Wait for 1 second
  delay(1000);
  // Turn the LED off
  digitalWrite(13, LOW);
  // Wait for 1 second
  delay(1000);
}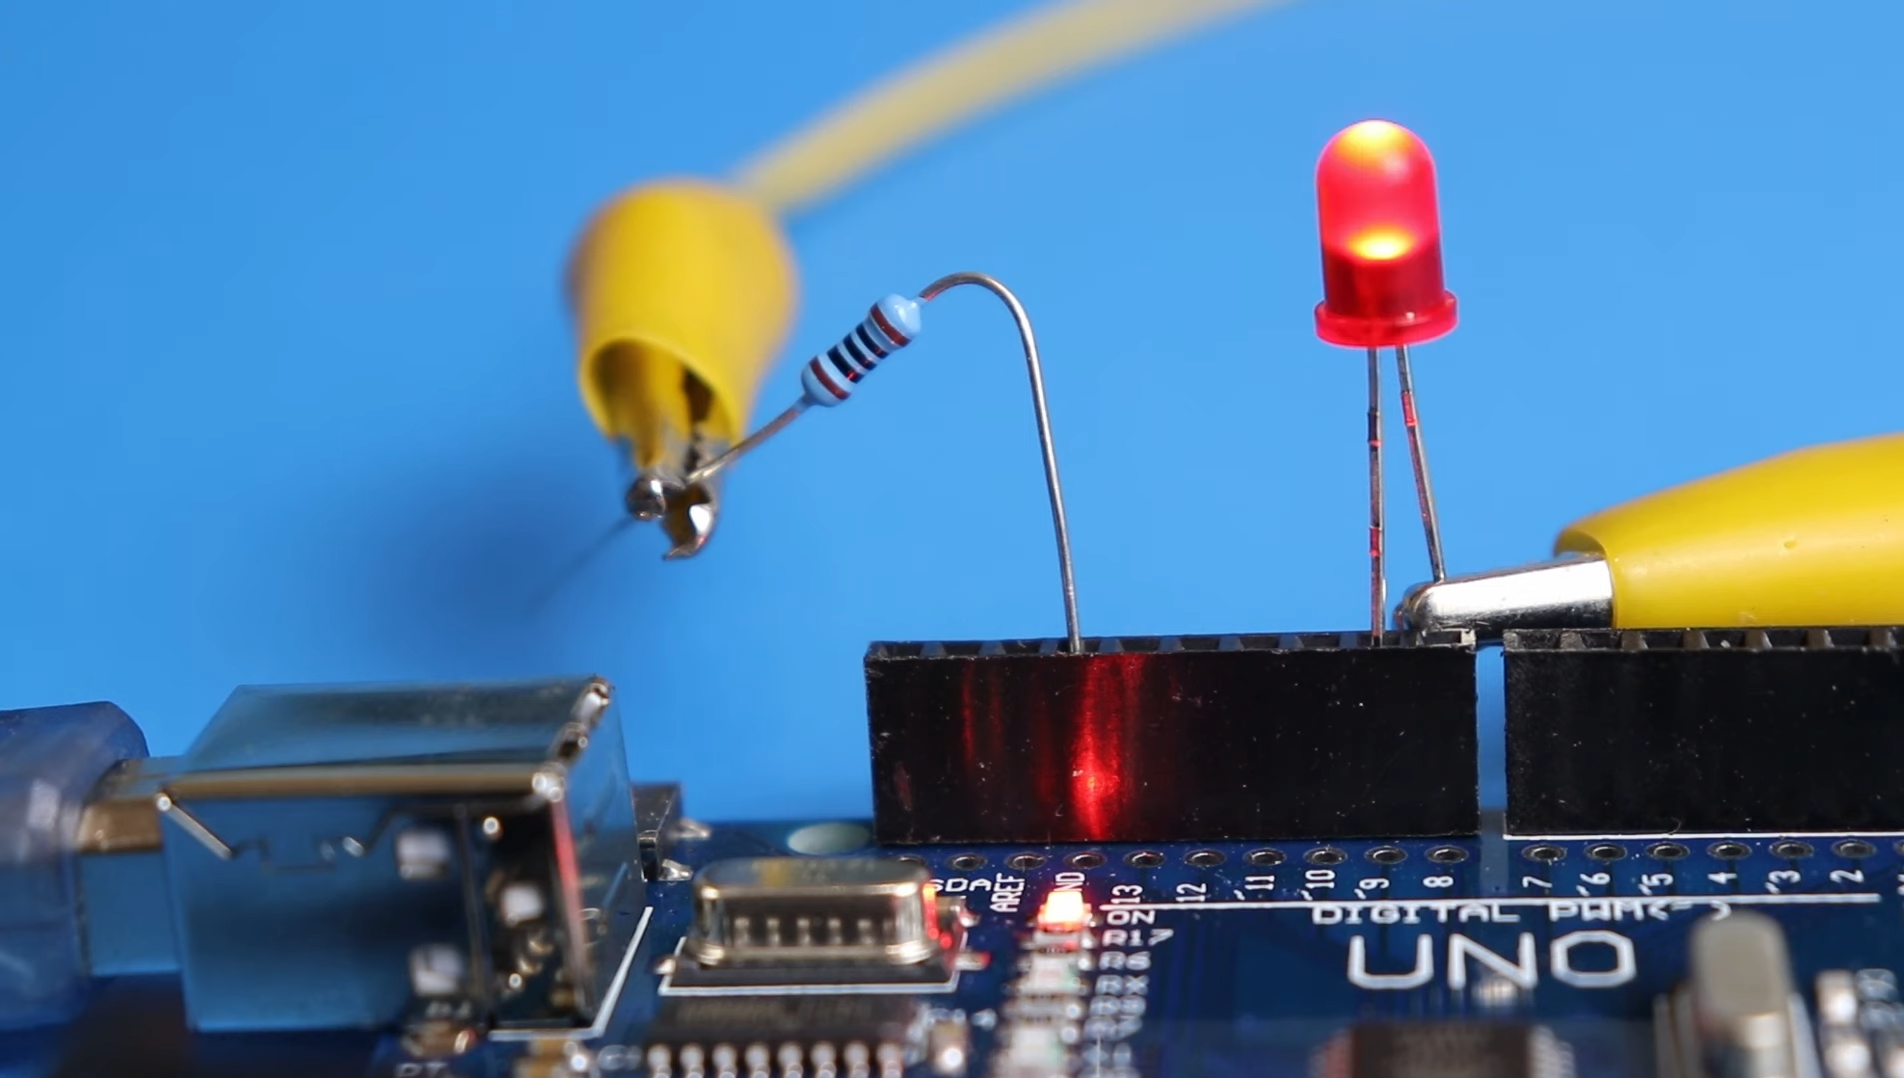
Blinking LED. Note that the image shows an LED connected to digital pin 9 however code sample states digital pin 13. This is a mistake, both the code and physical wiring should use the same digital output pin.
Building a Line Following Robot
Can it Teach Me?
At this point I was confident and ready to challenge ChatGPT. I asked it to tell me how to build an entire robot from scratch.

Like with the blinking LED example it starts off with a list of materials and the a step by step set of instructions. I decided to challenge it a little bit by asking a followup question of whether I could use a L298N motor driver instead of the recommended L293D motor driver and a set of four AA batteries instead of a 9V battery. It was able to approve these challenges and adapt to my new request. If you want to try building this yourself here are the components used:
3mm Acrylic for robot chassis
PLA filament for 3D printed mounting brackets
For the rest of this blog post I want to focus on the takeaways I learned from my conversation and how ChatGPT can be utilized by makers in their DIY projects. If you are interested in seeing the full robot build process instead, check out the YouTube video at the top of the page.
To review a full log of the conversation I had with ChatGPT: https://sharegpt.com/c/SQzWPKF
GitHub repo with the files ChatGPT created: https://github.com/WillDonaldson/ChatGPT-Line-Following-Robot
Alternatively, if you are interested learning how to build a line following robot from me (a real person!) and not an AI chatbot, you should check out the Intro to Robotics class I teach at ByteSizeRobotics.com

Check out some of my classes at ByteSizeRobotics.com
The Limitations of ChatGPT
ChatGPT isn’t perfect, the following are some takeaways I made while talking with the chatbot.
Confidence in incorrect information:
As demonstrated in the video, ChatGPT can provide incorrect information with confidence, you need to act as a curator and validate information from third-party sources. For beginners new to a field this can present challenges if you are relying entirely on ChatGPT to learn something new as you won’t have the broad knowledge to know when you are being led astray. It's important to challenge the information and use logical reasoning to correct any inaccuracies. The use of ChatGPT should be viewed as a starting point and not a sole source of information.
Restricted access to the internet:
ChatGPT only has access to data on the internet prior to 2021 and as such doesn’t always provide the most up-to-date information. It also can’t directly access if you want to send it a url to a specific webpage, a workaround is to copy the relevant information from that webpage and share it with ChatGPT in your conversation and ask it to respond.
Truncation of long answers and typing speed:
I understand why OpenAI has done this but damn is it annoying! ChatGPT “types” out responses as if it were a person writing in real time. The reasoning for this is two-fold: firstly, to give the chatbot a “conversational” feel in an attempt to get over the uncanny valley and secondly, to slow down the response time, preventing abuse by users looking to automate ChatGPT and deploy their application at scale (thereby driving ChatGPT’s server costs through the roof).
Truncation of long answers:
Another pet peeve is that ChatGPT will stop responding after a certain length. I think the reasoning for this is the same as the previous explanation but it can be frustrating when ChatGPT is writing out a piece of code for you and supply stops halfway through the program. Fortunately you can ask it to continue writing the code from the previous line. A few examples of this can be found in my conversation with the chatbot: https://sharegpt.com/c/SQzWPKF
Short term memory loss:
While ChatGPT can recall and make reference to earlier points in the conversation, multiple times I found that it would forget simple things that we had explicitly discussed. Some examples include the pin assignments I made during wiring, assigning new names to variables in the code, and not using software functions we had previously created together.
Conclusion
In conclusion, using ChatGPT to build a robot was an exciting experiment. The bot provided helpful information, but it's important to validate the information and use pre-existing knowledge to avoid mistakes. Overall, I had a lot of fun building a line-following robot using ChatGPT and I hope that this blog post will inspire others to try it for themselves. If you enjoyed this project you should check out the Intro to Robotics class I teach at ByteSizeRobotics.com, I also offer private tutoring if you’d prefer to learn from a real person and not an AI chatbot!
If you enjoyed this project you may also like this one: