Turbulent Rheoscopic Flow in Christmas Ornaments
This tutorial will introduce a method of making a Christmas ornament that is dynamic and mesmerizing to watch. By spinning a rheoscopic fluid in a clear ornament ball you will be able to see the turbulent flow of the fluid inside. "Rheoscopic" means the ability to "see fluid currents"; this is fascinating optical phenomenon is achieved by using a special fluid that contains light-reflecting particles that do not dissolve in solution.
This fluid mixture is one of those simple yet captivating phenomena like fire and magnetism that entertains children and adults alike.
Supplies:
Water (tap water works, distilled water is best)
Rheoscopic concentrate (I used Pearl Swirl, but there are multiple options)
Food colouring
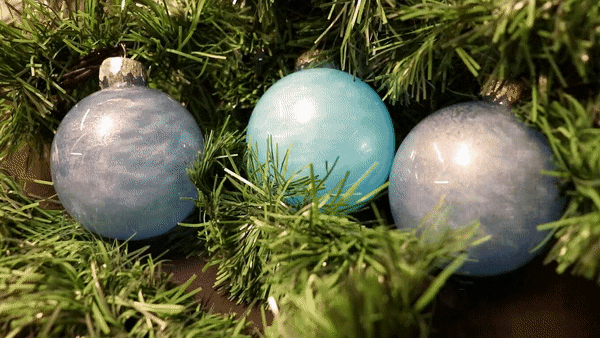
Clear, fillable Christmas ornaments (can be found at dollar stores and craft stores)
Hot glue
Coreless DC motor with drone rotor (like this)
Electrical wire, heat shrink tube, switch, fuse, solder, 3V power supply
Step 1: Mixing the Rheoscopic Fluid
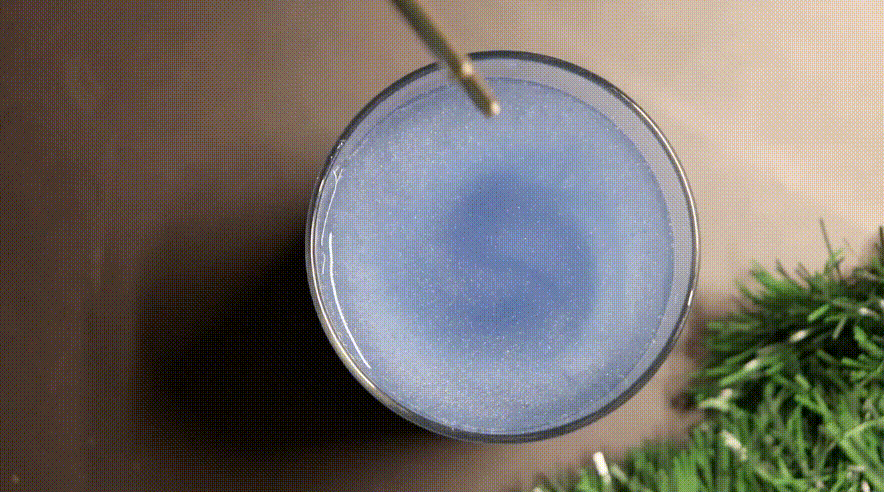
In a container mix 1L of water, 1 tablespoon of rheoscopic concentrate and a couple drops of food colouring. As you begin to mix the solution you will see chaotic flows arise. For the best results I recommend boiling the water first (to remove dissolved air), I personally didn't do this but I think the final result would look better if you did.
Note that if the fluid is allowed to rest for several hours most of the light reflecting particles will settle at the bottom of the container. This isn't an issue as long as you scrap the very bottom of the container when you come back to stir it. I left my own mixture for several days and within 20 seconds of mixing the rheoscopic effect came back fully.

Rheoscopic fluid mixture
Step 2: Methods to Agitate the Mixture
At this point, it is clear that a stir rod works very well for stirring the mixture. But I encourage you to experiment with different methods as it is a lot of fun to watch the turbulent flows. Some ideas that were successful for me: dropping objects in the container, a magnetic stir plate (as found in chemistry classrooms/labs), a tube to blow air through, and placing the room temperature fluid on a hot surface (to visualize thermal convection currents).
But coming back to the objective of making Christmas ornaments with this fluid, I found the best method was to use a small DC motor to stir the mixture (after all who want to aggressively rattle ornaments)?
It may seem silly at first to put a DC motor inside a fluid, and while generally, it is not a great idea, for short-term applications (like a couple of weeks until Christmas) it will not lead to an immediate failure. As such we can submerge the motor directly in the fluid to agitate it. Nonetheless, the likely cause of failure will still be corrosion from electrolysis on the brushes. I will come back and update this when the motors do fail, so far they have been going for 48 hours with no problems. Using distilled water will decrease the chance of failure compared to regular tap water.
I came up with 2 different configurations:
The vibration motor is commonly used in mobile phones as a notification feature. By soldering, thin wires are submerging the motor it can agitate the rheoscopic fluid, although the amplitude of agitation is small. The better performing motor was the coreless DC motor with a drone rotor blade attached.
Furthermore, the coreless DC motors only have open holes at their base (which will be sealed with hot glue), the end of the motor that has the axle coming out tightly mates with a metal bushing, making it difficult for any water to ingress, thus further delaying the potential electrical failure.
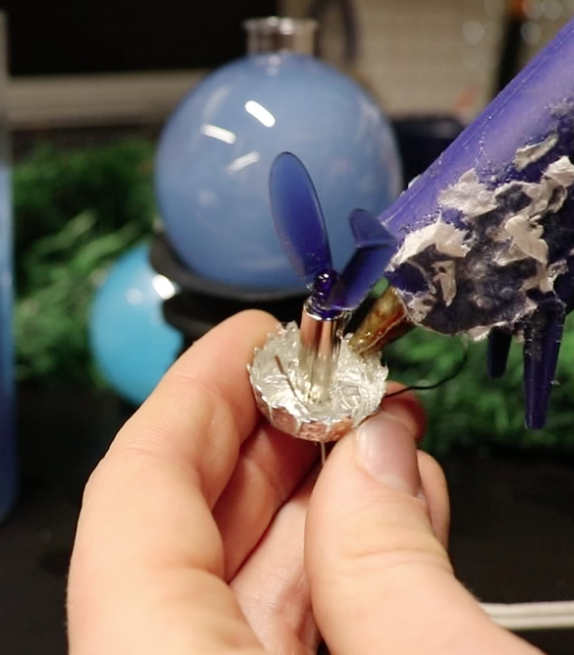
Step 3: Making the Ornaments
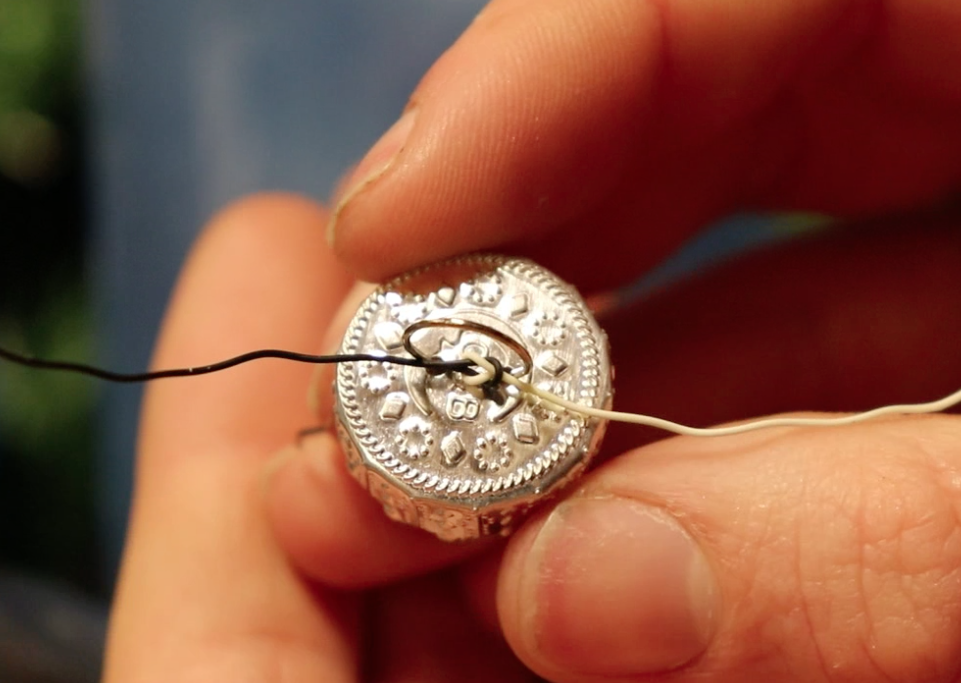
When the silver top of the clear, empty ornament is pulled off there will be two holes that the wires from the motor can be fed through (see below pictures). I then tied a reef knot to temporarily secure the motor in place. To permanently secure the motor I applied hot glue to the base of the motor, do your best to fully cover the base of the motor as this is the most likely point that fluid will get inside the motor.
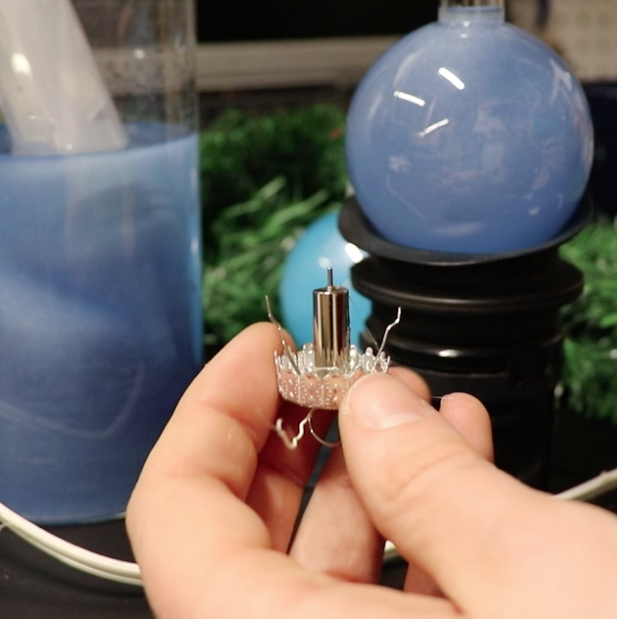
Before attaching the rotor blades you will need to bend them to fit through the neck of the ornament. I was able to bend mine without issue but in case yours is made of a brittle plastic you may want to heat them with a hot air gun first. Once bent, attach them to the motor (see pictures).
To transfer the fluid to the ornaments I found it easiest to use a plastic syringe but a funnel would work too. Remember to stir the mixture before filling the ornaments to ensure none of the particles have settled at the bottom of the container. Leave a little bit of air in the neck of the ornament as the motor will displace some of the fluid.
Fill the silver cap of the ornament around the motor with hot glue and quickly and firmly push it onto the neck of the ornament, ensuring that a waterproof seal is made between the surfaces.
Before proceeding to the next step ensure each ornament works by connecting the motor terminals to a 3V power source.

Step 4: Finishing Touches
Now that the ornaments have been made there are a few final steps to make them ready to hang. Firstly cut 2 lengths of wire with openings every 30 centimeters or so, at each interval solder a connection to the motor. I personally used some male-female connections (link) so that if one of the motors fails I can easily remove it without unsoldering everything. Add heat shrink tubing to insulate the solder joints, preventing short circuits. I also recommend connecting a fuse so that should one ornament fail the power supply will disconnect instead of melting the wires/damaging the power supply.
Finally, I wrapped the wires connecting the ornaments with some tinsel (you could also use LED lights if you wish). Hook the wires up to a 3V power source and you have a chain of ornaments, ready to hang.
Suggested improvement:
One improvement that I may add in the next version is instead of a fixed power supply I might try using a PWM driver to control the speed and direction of the motor. Personally, I like the slower speeds for visualizing the fluid currents.